Sunday, May 17, 2015

"Spirit of Alaska" Joins the Fleet

I picked up a Kato SD70MAC recently.  Engine #4001, the Spirit of Alaska, now runs my rails, hauling my passenger cars instead of the B&M Alco I was using.  I quickly bought a DCC chip for it and gave it a test run: nice and smooth.
Spirit of Alaska
The "Spirit of Alaska", SD70MAC #4001
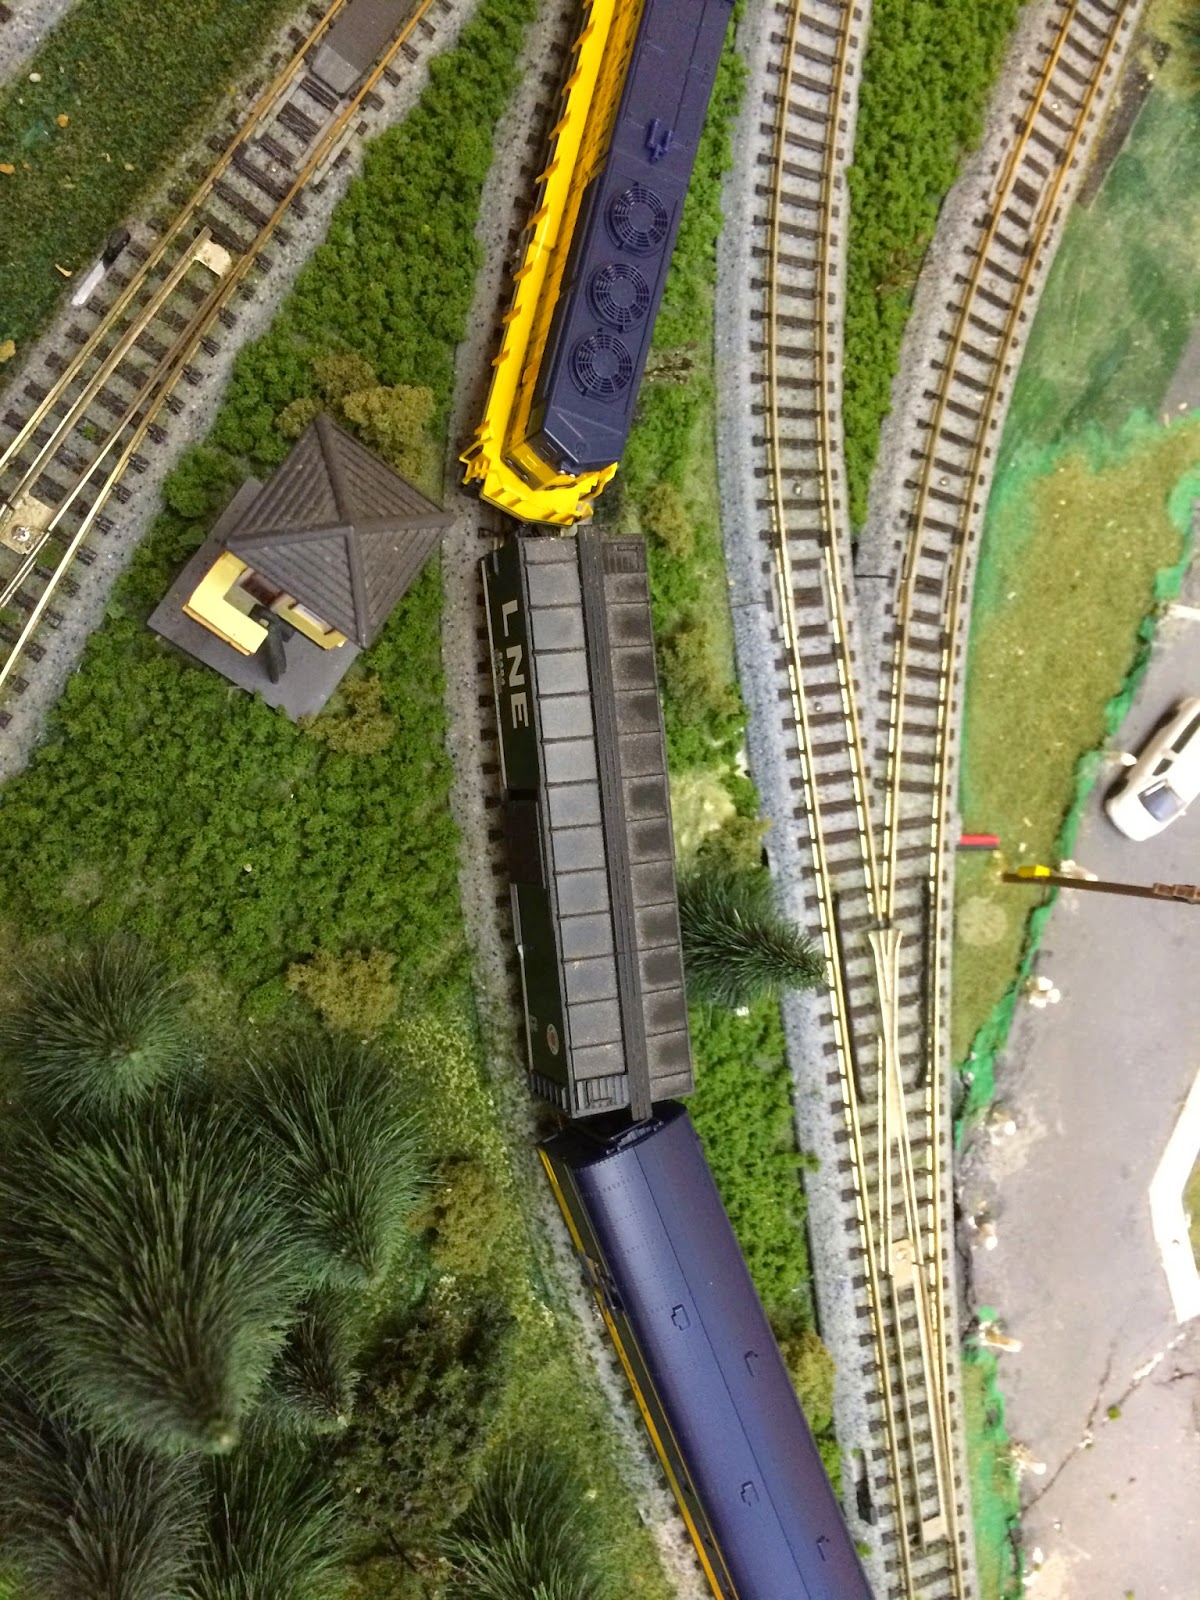
The front and rear guard rails need to be painted white.  I'll also have to do some tinkering with the coupler.  The body mounted coupler on the engine pulls the truck mounted coupler on the railway post office (RPO) to the outside of sharp curves, causing a derailment.  This happens because the truck on the RPO sits so far back and the coupler shank can't swing far enough in its factory supplied gear box. 
Derail
RPO Pulled Off the Track

I'm planning on swapping out the truck mounted coupler, on the RPO car with a body mounted coupler.  That should solve the problem.  For now, I have a boxcar in between the two. The truck mounted couplers on the boxcar keep the train on the track.

ARR
A Box Car Makes for a Temporary Solution


Monday, March 30, 2015

Track Tip: Stagger your rail joints.

While laying flex track years ago I discovered a method for keeping the rails parallel at a joint.  If not carefully laid, flex track will "kink" at a joint in a curve.  To combat this, typically you hear of people soldering the joints before bending the track.  I typically don't like to solder my joints, as I often change the track around and soldered joints would make this very difficult.

I discovered the rails will stay parallel if the joints are offset or staggered.  By carefully removing a few spikes, rail joiners can be offset.  Here is an example of such a joint.  The joints are separated by about an inch or more.  If very careful, you can accomplish such a joint without removing any ties.  This prevents you from having to glue them back in later.

Staggered Joints

Loop Expansion

With the transition from Kato Unitrack to Atlas Code-55 track, I decided to extend the table by a few inches.  This would allow for broader curves, and a more natural look to my new passenger cars.

Before Expansion and Conversion

After Expansion and Conversion

Tunneling

Every layout needs a tunnel!  I built a table in the closet to support the track as it ran through the "tunnel".  The track is positioned such that a second line could be run to the inside of the curve.  There is the possibility of adding a helix here as well.

Table built.

Detail of ramp: 3/4" rise.

Track Conversion

The layout I inherited from my grandfather was done with Kato Unitrack.  I knew I would eventually convert it to something more realistic.  I've liked working with Atlas brand track, and its easy to get a hold of, so it was my natural first choice.  That and I had a box of Atlas flex-track and cord roadbed in storage.

I could not convert the entire layout in one fell swoop, buying all the switches would exceed by budget.  I would need to do it in sections.  I planned on converting the loop first, followed by the various sidings.  In order to accomplish this, I created two sections of conversion track.  They would be placed at the beginning of the conversion and one would "move" with the end of the converted track as I converted different sections.

Custom built transition track
I built two pieces, each a different length.  I have one that is a combined 3" long and a second one that is a combined 9" long.

I'll upload another picture in the future, when the pieces are not in use. =p

Saturday, March 21, 2015

New Passenger Car Set - Kato Smoothside in N-Scale

Picked up a 6 piece passenger car set on ebay.


RPO: Railway Post-Office
Baggage Car
Coach
Diner
Sleeper
Observation
I  can't wait for these new cars to come in!  Of course....I have nothing to pull them, but still, nice find at $20 under original retail price.  (I paid $155 for the set)

From https://katousa.com/N/Smoothside/

Sunday, March 8, 2015

The Future

While the future is already set, it is also unknown.  I had all intentions of building an HO-Scale freelance model railroad based on the Alaska Railroad.  That has all changed.  With the inheritance of a substantial N-Scale layout and boxes of supplies, I will probably switch gears.  Amongst the stuff I inherited from my grandfather, were a couple N-Scale engines, a DCC switcher and 3 DC diesel engines.  In the few HO parts he had, were three DCC engines: a Steam Engine, a Diesel engine and a switcher.  He must have had an HO layout set up for DCC control at one time.  With the exception of a few odds and ends, everything was N-Scale.

Atlantic Coast Line HO

Maine Central (MEC) HO

L&N HO Switcher
After setting up Cy's layout and extending the loop of track, I got his DCC equipment working.  He had his layout wired for DC so I converted it.  The switcher he had was DCC, but the diesel engine he had was DC.  I was able to locate a DCC chip for it and upgraded it.

Boston & Maine No. 1502 with New DCC Chip


Its been fun watching the ol Alco RS2 run around the tracks...but my mind keeps drifting.  I'm dreaming of watching a pair of ARR SD70MACs pulling a line of hoppers around the track.  There is something about them.  Their size, their power, their color scheme....

I just might have to make this new N-Scale layout a freelanced Alaska Railroad theme.